RESEARCH?
At age SIX!? YES!!! Research at this age is as simple as asking a
question and finding resources to answer that question - then just telling us the answer (or drawing it, or writing it out - or however the child wants to express himself). I guess that is the one requirement to research in the beginning: that they come up with an answer to the original question, even if they move on to other questions.
As they get
older and are comfortable with knowing that they CAN do this research
and that their questions WILL be honored, then we started with simple
steps towards what we adults think of as research.
There is no one right way - except to follow a plan that is totally arbitrary to the child in front of you. Take a general guideline and adapt to the child's needs ;)
The first step for my son was encouraging him to write his answers in his own words. This lays the foundational skills for avoiding potential plagiarism. As he hit spots where he just couldn't do this own words because the others words were just SO wonderful and precise, I reminded him of quote marks to show the specific words of someone, and to put the name of the author and book in parentheses after his writing. Two years later, he is now footnoting these references.
When he starting getting into longer and longer research projects, he started writing his resources used on note cards. Then he could note page numbers of interesting bits of information for future referencing.
At age 8 1/2, he has not yet done full bibliographies with all the printing information --- did you at that age? Some people are aghast that Montessori at the elementary age encourages all this research, but not all the steps that you and I had in middle school and high school (and only minimally in elementary if at all!). When he puts a few paragraphs together, he does provide a list of his resources by title and author.
Speaking of plagiarizing and expectations - a girl at one of the local schools a year older than my son was talking about a report she had to write for school when she saw my son in the atrium doing some research on an ancient civilization. She saw him listing out his sources and where he got each bit of information - very loosely done but a step in the right direction. The two children talked a bit about research and I heard her comment, "I don't bother writing down where I got what, because I just copy sentences from different books and turn it in with a list of books I used." My son replied, "If you don't put direct copying into quotes, then it's not your work and you're stealing from that author who put a lot of work in that book!" (I never said those words to him! Not like that!) "Yeah, but I tell the teacher which books I used." "But if your report has your name on it, you're lying and saying it's your work when it's not. Just put it in quotes and say who said it - or say it in your own words. You wouldn't want to be a liar or thief!" She thought about it for a bit; walked away looking kind of angry and kind of sad; went back a little while later and asked him to show her what he meant. I didn't hear all the details, but I thought, "Wow - my son is really catching on!" And he wasn't being mean about things either (he can have a bit of an attitude so I was very proud of him in that moment).
Think BABY STEPS. Develop those habits in tiny steps at a very young age, and the work will just flow when they are older without having to unlearn old habits or develop new ones.
Use resources, aim for as many real experiences as possible, within research and without. This second one can't be overstated - you may not be able to take your child to an active volcano, so you may need to bring in videos or visit exhibits of as real-life as possible, but you can certainly get your children out into the community, talking to "experts", visiting those exhibits, sharing your stories of being at various places, touching the rocks that come from various types of volcanos, finding out what those rocks can DO for us, planning a real or pretend long-distance trip somewhere (and all the skills needed for that!), and definitely helping to plan real trips (errands, etc.). These skills are just part of real life and are not specific to Montessori ;) These things all help to develop planning skills, organizational skills, survival skills (even as basic as what to do if you are lost in a public place), and other life skills that we all want our children to have.
Real experiences :)
Thursday, November 29, 2012
Wednesday, November 28, 2012
First Great Lesson: God With No Hands
This is one of those posts I'm not quite sure where to put. Perhaps I should really do a blog over at Keys of the Universe - but I'm not sure I can do one more blog ;)
So I'll do my best to focus this on OUR home and OUR co-op ;)
Many times, I have stated that I strongly prefer the AMI albums over AMS albums and I provide several reasons, repetitively ;) It is because I feel SO strongly about them! AMI albums are keys-based, so to use the First Great Lesson, there just won't be as many demonstrations the first time around. They USED to have a WHOLE BUNCH in the initial presentation, but over the years of careful observation, several of the demonstrations have been separated out from the first Great Lesson of God with No Hands, into their own follow-up album pages. Thus a child can focus more on the main points at hand, then have plenty of review later for follow-up and emphasis on new or additional points. States of Matter, Further States of Matter, and Attraction and Gravity are three such "additional" album pages. Hence those album pages are as brief as they are!
(I say "demonstrations" here and need to adapt my albums to say the same thing - these are truly demonstrations much more so than experiments - we know the outcome and we are seeking to demonstrate a scientific principle - when the children are working to answer a question, form a hypothesis, set up a test, see it through and evaluate, now THAT is an experiment ;) ).
In our home, we stick with that. I at first thought I would add in all the great ideas from Miss Barbara's site (since I'd been reading that long before I had elementary training, and despite being overwhelmed by it all before going into any Montessori training, I thought it was still great and easily adaptable to my own family's needs)... but after observing and working in several Montessori classes during and after the elementary training, seeing the variety of ways the story was done, and the children's reactions....
Well, I stuck with my album page. It really hits home, focuses in, incites interests, and gets personal studying going. It didn't NEED anything else. Just those SIX demonstrations: see this link for the six.
And especially being at home, with an only child, and a part-time (one half-day a week) co-op, the minimal keys-based approach with lots of review just really made sense for us, allowing me to present in short bursts, leaving lots of time for follow-up and research, opportunity for me to observe and present another focal point of interest at the appropriate time, without feeling like I had to have to just *everything* in place at once, or (potentially) overwhelm the children with too much information. Focus - concentration - didn't I spend all of primary focusing on keys - focus - and concentration development? ;)
So at almost age 6, my son received the first Great Lesson, along with two young ladies (ages 10 and 12 at the time) - and they were hooked!
I wish I had taken photos at the time - I didn't :(
I had my large charts from training - at-home versions are good at half that very large size - 12x18 or so is perfect when feasible, but I used what I had ;)
We also had some supplies from Magic School Bus science kits - the test tubes are not the best idea for later work when you want to hold a test tube over a heat source or place it in hot water (the plastic melts), but it all worked for the first Great Lesson. I love test tubes for demonstrating layers (introduction to density) because you such a small amount and the children LOVE to repeat this work! They can use SUCH control using just small quantities and pouring into the narrow tube - or using eyedropper to transfer various liquids - lots of fun! LOTS of concentration!
We changed up some of the stuff to be melted - I did not have time to find non-lead solder (a little goes a long way when you do buy it though - so it IS a worthy investment) so I think I used a chunk of plastic; and I used an old key for the non-descript metal (broke the rules there, but again, it is what I had!). Another alternative to the solder is that plastic craft stuff that you can melt in hot water then shape into what you want - a bit of that starting to truly melt is perfect. The idea is to use different items to demonstrate the principle at hand, without getting all technical and detailed. Display, and move on with the story.
I also subbed in quinoa for the bebes or iron shot - because it was on hand ;) No other reason! You want particles that can be seen as they roll over and around each other.
When the children have a question, write it down for them so they don't forget. These questions become their research.
RESEARCH? At age SIX!? YES!!! Research at this age is as simple as asking a question and finding resources to answer that question. As they get older and are comfortable with knowing that they CAN do this research and that their questions WILL be honored, then we started with simple steps towards what we adults think of as research. (more in the next post!)
Want to know our follow-ups to the first Great Lesson, the first time around? And other times? See two posts from now ;)
So I'll do my best to focus this on OUR home and OUR co-op ;)
Many times, I have stated that I strongly prefer the AMI albums over AMS albums and I provide several reasons, repetitively ;) It is because I feel SO strongly about them! AMI albums are keys-based, so to use the First Great Lesson, there just won't be as many demonstrations the first time around. They USED to have a WHOLE BUNCH in the initial presentation, but over the years of careful observation, several of the demonstrations have been separated out from the first Great Lesson of God with No Hands, into their own follow-up album pages. Thus a child can focus more on the main points at hand, then have plenty of review later for follow-up and emphasis on new or additional points. States of Matter, Further States of Matter, and Attraction and Gravity are three such "additional" album pages. Hence those album pages are as brief as they are!
(I say "demonstrations" here and need to adapt my albums to say the same thing - these are truly demonstrations much more so than experiments - we know the outcome and we are seeking to demonstrate a scientific principle - when the children are working to answer a question, form a hypothesis, set up a test, see it through and evaluate, now THAT is an experiment ;) ).
 |
| AMI uses art-forms instead of photography so the children get the emphasis on *impression* thus providing opportunities within their research for finding real photos of the various principles in action. And it encourages the children to re-create, thus encouraging creativity. There are a variety of stylistic versions. Keep them simple! |
Well, I stuck with my album page. It really hits home, focuses in, incites interests, and gets personal studying going. It didn't NEED anything else. Just those SIX demonstrations: see this link for the six.
And especially being at home, with an only child, and a part-time (one half-day a week) co-op, the minimal keys-based approach with lots of review just really made sense for us, allowing me to present in short bursts, leaving lots of time for follow-up and research, opportunity for me to observe and present another focal point of interest at the appropriate time, without feeling like I had to have to just *everything* in place at once, or (potentially) overwhelm the children with too much information. Focus - concentration - didn't I spend all of primary focusing on keys - focus - and concentration development? ;)
So at almost age 6, my son received the first Great Lesson, along with two young ladies (ages 10 and 12 at the time) - and they were hooked!
I wish I had taken photos at the time - I didn't :(
I had my large charts from training - at-home versions are good at half that very large size - 12x18 or so is perfect when feasible, but I used what I had ;)
We also had some supplies from Magic School Bus science kits - the test tubes are not the best idea for later work when you want to hold a test tube over a heat source or place it in hot water (the plastic melts), but it all worked for the first Great Lesson. I love test tubes for demonstrating layers (introduction to density) because you such a small amount and the children LOVE to repeat this work! They can use SUCH control using just small quantities and pouring into the narrow tube - or using eyedropper to transfer various liquids - lots of fun! LOTS of concentration!
We changed up some of the stuff to be melted - I did not have time to find non-lead solder (a little goes a long way when you do buy it though - so it IS a worthy investment) so I think I used a chunk of plastic; and I used an old key for the non-descript metal (broke the rules there, but again, it is what I had!). Another alternative to the solder is that plastic craft stuff that you can melt in hot water then shape into what you want - a bit of that starting to truly melt is perfect. The idea is to use different items to demonstrate the principle at hand, without getting all technical and detailed. Display, and move on with the story.
I also subbed in quinoa for the bebes or iron shot - because it was on hand ;) No other reason! You want particles that can be seen as they roll over and around each other.
When the children have a question, write it down for them so they don't forget. These questions become their research.
RESEARCH? At age SIX!? YES!!! Research at this age is as simple as asking a question and finding resources to answer that question. As they get older and are comfortable with knowing that they CAN do this research and that their questions WILL be honored, then we started with simple steps towards what we adults think of as research. (more in the next post!)
Want to know our follow-ups to the first Great Lesson, the first time around? And other times? See two posts from now ;)
Tuesday, November 27, 2012
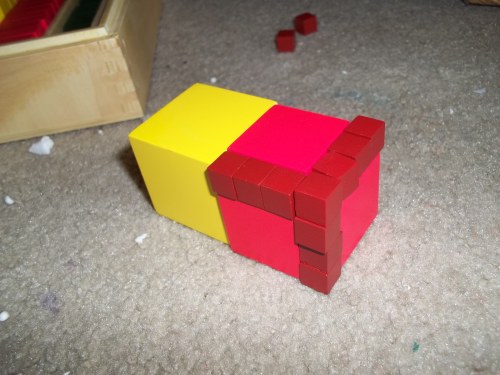
Cubing - Part 3 - Just exploring
After all was said and done, he really, really, really wanted to just build with the squares and cubes. Ok, I said - but you have to graph out your creations. He agreed and off he went:

The camera batteries died after that - and my own batteries were slowing down so I didn't replace the camera batteries until the next day. When he graphed this on paper, he did it two ways - straightening up the inside pieces as he worked:
- straight down - so just the tops of each piece. He wasn't satisfied with this because it was a 3-d work.
- he tilted it and drew it out on the graph paper with diagonals in some of the boxes to show both the tops and the full fronts of each piece. That is better he said, but still tricky. He colored the sides in a darker shade of each color than the tops (outlining the tops of the white walls in gray, and coloring gray for the sides).
So what did this work entail:
- geometry
- art
- aesthetics
- architecture
- planning
- viewpoint adjustment
Good skills going on!
Monday, November 26, 2012
Algebraic Trinomial Cube
This cube goes by several names - but the most important fact is that it is NOT the trinomial cube.
As Legoboy so recently and astutely discovered:
 |
| Poorly cropped - but 1) someone skipped getting dressed 2) I wanted to include an image of the squaring/cubing |
 |
"It's just like the trinomial cube!" He proclaimed when he first saw it. "But the colors are different," he side-commented to me to be sure I didn't ask him about the changing colors as I did with the tower of cubes versus pink tower.
But I still had him one-upped ;) "Hmm. Different colors, alright. I'll let you explore this while I go do something else and keep myself from interrupting you!" He just smiled and proceeded to work.
When he was done, he brought it to me, and said, "Oh Mama! The colors were VERY different! They didn't even match the lid on every layer like the trinomial! This is a CRAZY cube!" (keep in mind our trinomial cube is not in our home right now - it's over at the local school building).
I told him as soon as we get our trinomial cube back into our hands, I will show him the story of the Three Kings. Of course, just to be contrary, he says, "I already know about the Three Kings! I can skip that presentation!" (sound like some adults we know? I already know it (based solely on the title or perhaps the title and the main headings, then skip the actual content, which just MIGHT actually be nuanced different, if not entirely different... and then wonder why things aren't working right;) hehe - Yep, that describes me!)
"Oh no, my son, not THOSE three kings! These are the Cubed Kings!" That got his interest up! He's been asking for a week now. Perhaps next week we'll get to it. I like to keep up some anticipation (and I do want to review a couple of other concepts before working with the Kings.).
Yeah, we had fun with this one!
 |
| Stylized version - I know how tricky the illustrations can be! Tricky - but NECESSARY for each and every step! |
Pick up a Keys of the Universe mathematics album ;)
HONEST review here - from a homeschooling mom - NOT from a Montessori trainee:
There is a free elementary math album available online, with which I usually agree as to the order and general set up of presentations, but I am thoroughly perplexed by its version of the Three Kings - (this part comes from me as a trainee: and I KNOW it! And I know what is trying to get across and what comes next.) Back to being JUST a homeschooling mom: But the instructions are confusing, the story is BLECK-boring until you realize that the *actual* story comes after the presentation in the album and is actually mildly interesting but leaves some strange questions, the whole set up begs to know what pieces to move when and as a mom I want it all together so I can SEE what is going on, and I really-really want those black pieces to be the same height as their king - it just makes sense when you see the other attendants the same height as their own king. But this album has them all laid flat. It just does not look appealing - while mathematically correct, there is another way that makes the math more clear, leaves out the strange questions and keeps the appropriate parts of the presentation together in order. I'll stick with the Keys of the Universe version ;)
Sorry! I really do LIKE that album - I just don't "love" it and I'm very honest about things these days.
Saturday, November 24, 2012
Cubing Material - Part Two - the REAL fun begins!
We had a fun morning exploring all of our "new" materials and it was too much for just one post ;)

He finally asked me, "So what is this material for?" He has seen it at work in a classroom but it has been a while and he was not yet ready for it. He has been working with the early squaring and cubing and playing the decanomial games and calculating the values of pyramids and towers (with the bead cabinet material). So now we are on to something new.
I challenged him (before doing the actual album page) to construct one cube into its next cube.
Little secret - shhhh! Don't tell Montessori "purists" (of which I consider myself one, but with a different definition)... but Legoboy has not officially done the work with building from one square to the next square! Ahah! I have RUINED MY SON! Hahahaha - not really! I have followed an interest, in the moment of pure joy over discovering he already knew something about this material, helping me organize it - now is the perfect moment to introduce the concept!
Thus, the challenge:
 |
| Can you turn the cube of 3 into the cube of 4, using ONLY the materials here????? |
Well, he tried all sorts of ways - some with relative success - some were just tedious and annoying (a wall of 1s) and he started figuring out where he could exchange squares of 1s for squares of larger numbers. He was presenting a series of problems (issues) to himself - knew I had an answer, so he continued to keep working, to 1) see if he could figure it out himself and 2) see if he could formulate the right question to get the answer he wanted (he knows I don't easily answer questions - that I am going to guide him in his thinking anyway, and he finds it "easier" to do as much himself first ;) ).
 |
| eh!? it was a first attempt to see what he could find in patterning and sizes.... |

 |
| Replaced the cube with a series of squares just to see what could be done. he recognized patterns from the decanomial work! |
 |
| Not bad - and getting there. But what about all those squares? isn't there something easier? I modified the challenge to state, "build this cube of 3 into the cube of 4" (I'd reviewed my album page in the meantime - yep, even I have to review ;) ) |
 |
| Back to the original cube. |
 |
| A wall of ones - this got tedious - FAST. |
 |
| But he managed to get it. Then it all fell off. |
 |
| He thought, "what if I use the cube AND add squares?" |
 |
| I didn't tell him - but this is VERY close to the actual presentation - all the right components - just in the wrong spots. He built the squares at odd angles around the cube. |
 |
| It's kind of pretty from this angle ;) But doesn't express the mathematical formula. So I told him, "Ah, you are so close! Is there one more easier way to rearrange just THESE pieces???" |
 |
| SUCCESS! And now the mathematics is displayed! |
Subscribe to:
Posts (Atom)